NESPi Software Install Guide
This is a software install guide for the DaftMike DIY clone build. DaftMike was the original creator of this project and has made several video guides and blog posts on the topic. However, he never shared how to do advanced features like NFC tag writing and cooling fan software. This guide will include instructions to create a full featured mini NESPi build.
If you have been following DaftMike's progress, this guide should look very familiar to you with a few small changes. The code files have been changed, and several steps have been removed / added to fix some common issues like controller configuration permissions.
This guide assumes that you already have an Electronics Kit and have assembled all the wiring. If you still need to assemble your Electronics Kit, visit the Assembly page. If you have any questions, please post them to the Facebook Mini NES Builders Group.

Part List
Before we start you'll need to make sure you have:
- Raspberry Pi 2 or 3
- Micro SD card
- SD card reader
- USB keyboard
- Ethernet cable (optional if using wifi)
- Micro USB Power supply and cable
- HDMI cable and TV
- Electronics Kit
You can follow this guide without the Electronics Kit. However, this guide will be focusing on NFC / Arduino integration using the Electronics Kit. The Electronics Kit can be purchased or built. Sellers and Schematics are available on the Facebook Mini NES Builders Group.
Package Downloads
Start by downloading the RetroPie image. The RetroPie project also has a installation guide that is really useful as a reference.
- Download the image for Raspberry Pi 2/3.
- Extract the the .img files from the .gz file we just downloaded, ready to write to our micro SD card.
- Write the .img file to the SD card using Win32 Disk Imager on Windows
- Eject the SD card when complete and insert into the Raspberry Pi
First Boot
Ensure that the following are installed on your Raspberry Pi:
- USB keyboard
- Ethernet cable
- Electronics Kit
- USB power cable
The Raspberry Pi can be directly powered by plugging the USB power cable into Raspberry Pi, or indirectly powered by the Electronics Kit by plugging the USB power cable into the Electronics Kit. To power on your Raspberry Pi using the Electronics Kit, hold down the RESET button until the status LED flashes white. The status LED will then turn Blue or Orange (depending on if you have a NFC tag near the reader) and the front red LED will pulsate.
Using an ethernet connection is recommended but you can also use WiFi.
Your Raspberry Pi should now be powered on and will start to boot. Your Raspberry Pi will reboot a couple of times to finish installing the RetroPie software. Eventually, you will be greated by the welcome screen.

Use the keyboard and press and hold any key to continue to the controller configuring page. Go through this process pressing the keys on the keyboard to map to the controller inputs. Setting up your keyboard now will let you navigate EmulationStation for the purposes of setting everything up. After controller setup you will be sent to the main menu of Emulation Station. You will notice that there are no emulators and the only option is the settings page, this is because we have not transferred any games yet.
You may now configure wifi if you like, go here for instructions to configure
PuTTY Commands
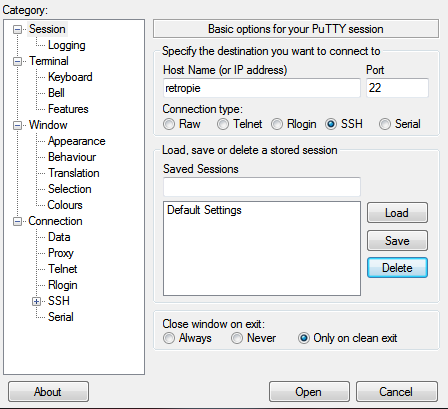
To command the Raspberry Pi from your PC, download PuTTY. This programs allow us to connect to the Raspberry Pi so we can install and setup the dependent software on the Raspberry Pi. For the following steps, it is recommended that you copy the lines below and paste them into the PuTTY terminal by right clicking inside the window. More instructions are available here.
- Make sure your Raspberry Pi is on and connected to the same network as your computer.
- Start up PuTTY and in the 'Host Name' box type 'retropie', make sure SSH is selected and then click open.
- Host name: retropie
- Connection Type: SSH
- Enter the following when prompted for the login.
- User name: pi
- Password: raspberry
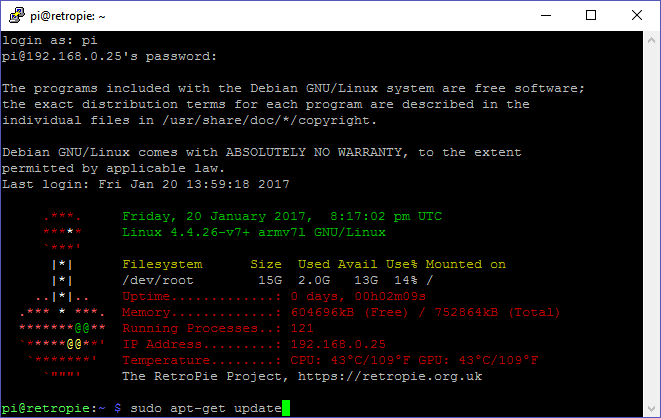
- Install the Python dependencies that we use in our NFC reading program. (one at a time!)
sudo apt-get update
sudo apt-get install python-dev python-pip python-gpiozero
sudo pip install psutil pyserial - After pasting a line hit enter and 'y' if prompted, to download and install each module.
Next we need to change the default settings for the serial port.
- Now we need to edit the boot config to enable the serial port for us to use in our program.
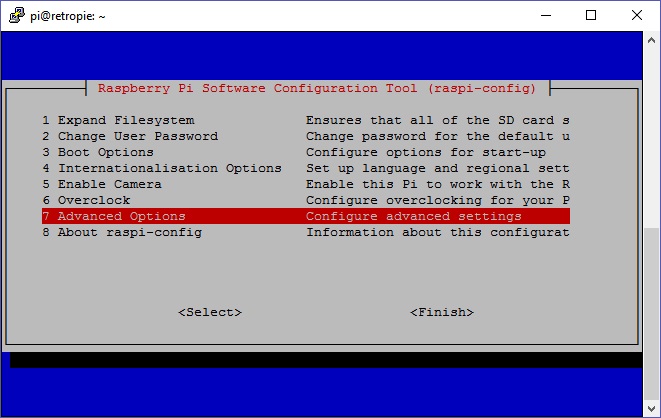
sudo raspi-config - We need to scroll down to 'Advanced Options' then 'Serial' and select 'No', then 'Finish' to exit.
- Use your arrow keys to navigate this page and Enter key to select.
- Now we need to edit the boot config to enable the serial port for us to use in our program.
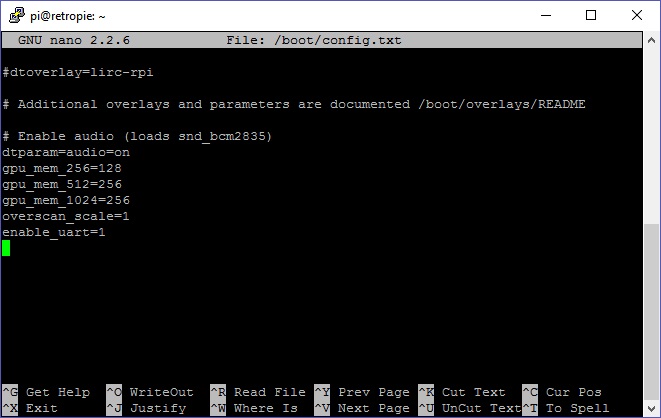
sudo nano /boot/config.txt - This command opens up the config file in a text editor(nano). We need to change the very last line.
- Scroll down using your arrow keys and change 'enable_uart=0' to 'enable_uart=1'.
- Hit 'Ctrl+X' then 'y' and finally 'Enter' to save and exit.
Change the RetroArch settings to enable RetroPi network commands:
- Use the PuTTY command line to open configs/all/retroarch.cfg
sudo nano /configs/all/retroarch.cfg - Find network_cmd_enable
- Set to true
network_cmd_enable = "true" - Hit 'Ctrl+X' then 'y' and finally 'Enter' to save and exit.
The Network Commands are used by the NESPi python script to send Reset Emulator commands.
Tip: The keyboard is no longer needed for setup. You may now setup your USB controller using the Quick Menu and then select Configure Input.
- Leave PuTTy open and continue to File Transfers.
WinSCP File Transfers
To transfer the files, use WinSCP. This program allow us to connect to the Raspberry Pi so we can transfer files. The steps here are a summary of the official file transfer guide for RetroPie found here.
Download the NESPi project zip.
- Make sure your Raspberry Pi is on and connected to the same network as your computer.
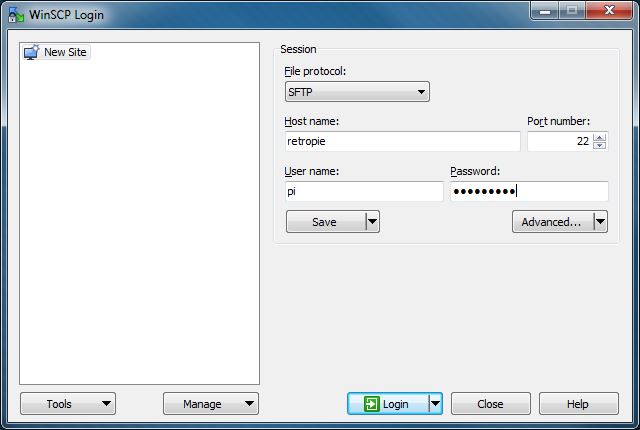
- Log in using WinSCP and the following details:
- Host name: retropie
- Port number: 22
- User name: pi
- Password: raspberry
Tip: If you are using a momementary pushbutton switch for the POWER button instead of the recommended latching type, then you need to make some modifcations per the notes commented in the nespi.py file.
-
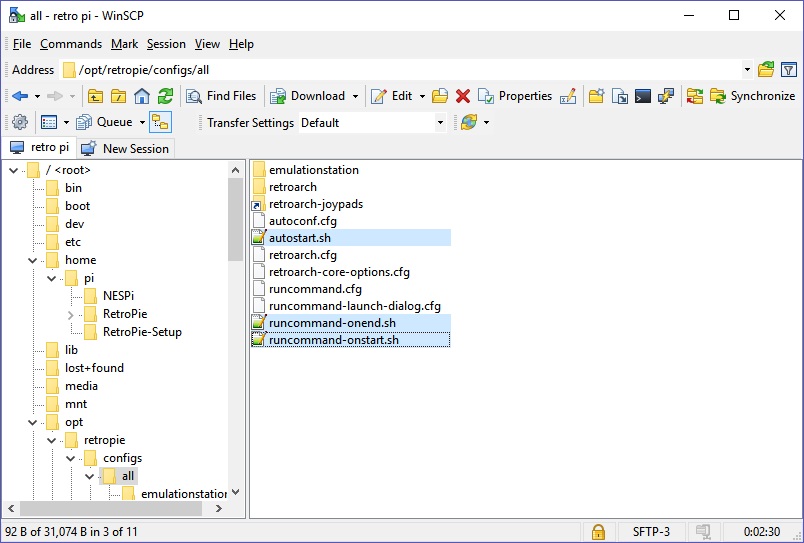
Drag and drop the following files to the listed path on the Raspberry Pi.
This will overwrite the existing files so the nespi.py script is in control of the EmulationStation application.
opt/retropie/configs/all/autostart.sh
opt/retropie/configs/all/runcommand-onstart.sh
opt/retropie/configs/all/runcommand-onend.sh
home/pi/NESPi/nespi.py
- At this point, you may also tranfer your roms. Roms need to be placed in the correct console folder.
For example: /home/pi/RetroPie/roms/nes - All the software is installed and we are ready to reboot. Back in the PuTTy window, command a reboot.
sudo reboot
The Raspberry Pi will now reboot, when finished we should be ready to play with some cartridges.
Programming NFC Cartridges
In addition to reading, the Electronics Kit is capable of writing NFC tags. To do this you need to first transfer some games to your system as above, then follow these instructions:
- Launch the game you want to write to the cartridge from EmulationStation using your controller.
- Exit the game back to the menu by pressing 'Select+Start'
- Remove the cartridge so the NFC reader detects no tag present.
- Press in the 'POWER' button (so the power button is in the 'on' position). Nothing happens on screen.
- Insert the cartridge you want to write to.
Remove Cartridge then Press POWER
- Press the 'POWER' button again (so the power button is in the 'off' position). The game that you last played will be written to the cartridge in the slot.
- The status LED will flash Blue / Red / Green indicating that the cartridge writing was successful.
- To test the cartridge, eject then re-insert. The status LED will turn Green. Press the 'POWER' button to launch the game.

Press POWER Again to Write NFC
Status Lights and Troubleshooting
The status LED shows us the status of the system. It gives us information about the cartridge slot and system status. If your status LED is dark, press the RESET button twice to enable/disable.
In normal operation the status LED will be Orange, this tells us that there is no cartridge in the slot.
When you insert a cartridge with an compatible NFC tag, the status LED will turn Aqua.
If your tag is blank, then the status LED will stay Aqua however if there is data written to it then it will change color to Green.
(if not, try removing the cart and blowing on it before re-inserting).
The system checks the rom filename and if it's correct then the status LED will turn Green and you can start the game by pressing the 'POWER' button.
Writing your carts with the system itself as described above should mitigate errors.
If there is a problem with the cartridge, the status LED will turn Red.
Check you have the rom in the correct folder, including the extension.
Example: rom_name.nes
Normal Status Light when Inserting a Good Cart.
Press POWER to start game.
Additional Functions
Power on:
Press and hold the 'RESET' button until the LED flashes white. The status LED will be Aqua or Orange (depending on if you have a NFC tag near the reader) while the system boots-up and the front red LED will pulsate.
Manual shutdown:
To shutdown the system, press and hold the 'RESET' button until the status LED flashes Red. The front red LED will pulsate during the shutdown and will turn off when it is safe to unplug the system.
Shutdown detect:
If you trigger a shutdown or reboot of the system from within RetroPie, then the status LED will turn Purple and the front red LED will pulsate. After 30 seconds, if the arduino does not detect a signal from the Raspberry Pi then the power will be turned off.
Hold RESET to Power On / Off
Disable Status LED:
The status LED can be annoying while playing in a dark room. To toggle on/off, press the reset button twice.
Press RESET Twice to Disable LED