Menu
Ghostbusters Costume
 This was a joint project between my brother and myself. This page
points out the less obvious details of the construction of a proton
pack.
This was a joint project between my brother and myself. This page
points out the less obvious details of the construction of a proton
pack.
Table of Contents
- Construction Summary
- Parts List
- Lights
- Sound
- Individual Boxes / Parts
- Image Gallery
- Video Gallery
- Conclusion
Construction Summary
My brother got the idea he wanted to be a ghostbuster this year. He wanted his costume to be as movie accurate as possible complete with a proton pack. This meant he needed lights / sound and my mother convinced him he needed my help. I agreed on one condition, that I could also be a ghostbuster for Halloween.
Here are the project goals:
- Movie accurate design and labels
- Functional lights and sound
- Military surplus parts
As time went on our goals split. While his remained as movie accurate as possible I made several changes for durability and functionality. Wood vs foam boxes and internal vs external MP3 player.
We both had out specialties. My brother's job at a sticker factory gives him the special ability to find random stickers and have custom professional level stickers made. My schooling focused on circuit design.
While I did research in into the proton pack light patterns and
movie recorded MP3s of operating sounds, my brother worked in parallel.
He did research into the
outer shape / design of the proton pack and ideal
sellers of military surplus.

I made a parts list and had Dale verify the project budget. Most items we bought online, but for obvious reasons this is not possible for some items. We went to the hardware store and picked out a cheap sheet of plywood and a 50% off damaged sheet of foam insulation. We split the foam board between us, 50/50.
I printed out a 1:1 cutout for the main board and cut several with a
 jigsaw. I also used the plywood to make us a pair of gunboxes, which would
have been a tricky shape for my brother to cut out of foam.
jigsaw. I also used the plywood to make us a pair of gunboxes, which would
have been a tricky shape for my brother to cut out of foam.
As the parts ordered from online began to arrive, I began working on a
prototype for the light circuit. Dale was busy gathering stickers and
misc parts while also shaping the foam into boxes and mounting them on the
main plywood board I delivered.


With a month remaining before Halloween, it just so happened that the only things I had constructed on my proton pack were the power cell box and cyclotron with functioning lights. While my brother was missing the power cell box and functioning lights. So we made a trade. He would finish arranging / constructing the remaining boxes on my pack while I would install the light circuits in his. At the end of the two week trade his proton pack was nearly finished and mine just needed a paint job and other touch ups.
Parts List:
More info on specific online merchants is available on the forum in the Shipment Tracking post. I kept track of the running total throughout the project and it ended up being $125 for everything.
- Plywood / Fiberboard
- Insulation Foam
- ALICE Frame & Straps
- MP3 Player
- Powered PC Speaker
- Matte or Glossy Black Vinyl Paint (spray paint will melt foam)
- No-Ghost Patches
- Warning Labels
- Flight Suit (read up on military clothing sizes)
- Electronic Parts List (below)
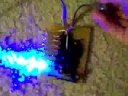
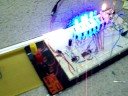
Lights
Everything else described on this page can be built with no previous experience, but this section requires an understanding of electronic fundamentals and the ability to read an IC specification sheet. More info / pictures / videos are shown in the forum, but here is a summary of what I did.
Electronics Part List
- 4017 Decade Counter IC
- 4015 Shift Register IC
- 555 Timer IC
- 2N4401 NPN Transistor, QTY=11
- 10K Resistor, QTY=13
- 50K Resistor
- 1K Resistor, QTY=7
- 50K Potentiometer
- 1uF Electrolytic Capacitor
- 10uF Electrolytic Capacitor
- .01uF Ceramic Capacitor
- 16 Pin IC Socket, QTY=2
- 8 Pin IC Socket
- Blue LEDs Super Bright, QTY=7
- LED Tail Lights, QTY=4
- Perf board, pre padded rows.
- 4 D Cell Battery Holders, QTY=2
The IC sockets are optional but they always come in handy when mistakes happen.
This part list is based on the circuit found here and posted here, but altered to use 7 LEDs instead of 14 lamps. That change also explains the additional 1K resistors and the single 4015 IC. The other changes I made were to split the board in two so the 4017 IC could be near the cyclotron lamps (3 wires connecting the two boards: +12volts, ground, clock) and wiring a master power switch on the ground wire. This was probably not the smartest idea (power switches should always be on the positive voltage) but it came from my earlier multi-voltage designs.
Originally, I ran the circuit with multiple voltage levels for the different chips. This worked fine for the prototype but when I made a circuit and added a few switches a misplaced wire fried 2 of the ICs. I recheck the specification sheets for the ICs and saw that they were rated to handle a 12 volt supply. The circuit was then made to use a much simpler one voltage level. I changed the limiting resistors on the LEDs to 1K and they were still very bright. 12V/1K=12mA for a 25mA LED.
Problem was I had spare components on hand for everything except the one IC that I fried. So I had to overpay for shipping of an additional three 4017 ICs. This brought a $0.50 setback up to $6.00 and they still sent it first class USPS (~$2).
Using a multimeter I measured the amperage used by the light circuits (120mA) and the sound circuits (140mA). Using wikipedia I found the capacity of a normal alkaline D cell battery, 19500mAh. Some quick division reveals the runtime for my proton pack is 75 hours.
Sound
For both packs a powered PC speaker was used. I had a few of these in my junk pile. They were abandoned because they were missing power cords or left speakers. One of them I junked because it had a faulty power supply (overheating). For both packs I rewired the amplifier circuit to run on the 12 volt battery power from the pack and either removed the volume dial or left it cranked to max.
The PC speakers were salvaged from different computers so they each had their pros and cons. Dale's was much louder but only had one speaker. Mine had quieter but had and extra speaker I could mount on the pack as well as the gunbox and had blue LEDs powered by each speaker.
The sound was generated by MP3 players. This was chosen for ease of use and high audio fidelity. The MP3 player for mine was a cheap and small MP3 player purchased on ebay for ~$5. It was small enough to mount inside the gunbox with the amplifier and speaker. I rewired it to run on a AA housed on the outside of the gunbox and the play button was wired to the "Intensify" button. My brother's MP3 player was a zune and I ran a headphone jack wire down to his pack with ~10 inches of slack so he could keep his zune in his pocket.
The only MP3 file I put on my player was the power up sound. Dale's had a full range of sounds including the power up sound, shooting sound, power down sound, and various ghostbuster soundtrack songs.
I am only hosting the proton pack power up sound: KJH_PackstartCombo.mp3
You can find more sounds here: hprops.com
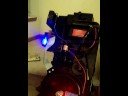
Individual Boxes / Parts
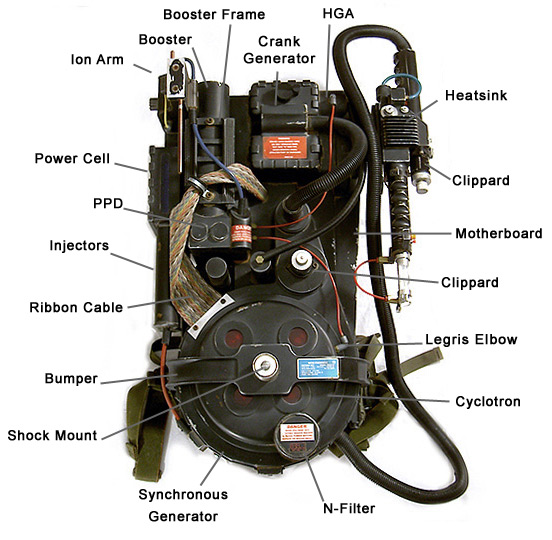

Motherboard
I also call this the main board. It is the basic shape of the proton pack and is made out of plywood. The main board contains two of these plywood boards which sandwich a similar shaped foam board spacer. This adds thickness to the mainboard and allows extra room to run wires and hold batteries.
Cyclotron
 This is the large round part on the bottom and is made from a microwaveable
lid bought from the dollar store. It sits on top of the spacer which is
made of the insulation foam. These both conceal the lower circuits and
batteries.
This is the large round part on the bottom and is made from a microwaveable
lid bought from the dollar store. It sits on top of the spacer which is
made of the insulation foam. These both conceal the lower circuits and
batteries.
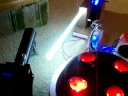
You can also see the cyclotron lamps which are always red. Since the proton pack is powered at 12 volts, it was easy to use small automotive tail lights. This presented the opportunity for additional light patterns because the tail lights have extra modes: HIGH, LOW, & OFF.

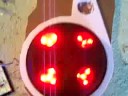
Powercell
This is a wooden box that houses the blue LED bar circuit. On the side you
can see a potentiometer sticking out that is used to adjust the speed of
the light patterns. The front window was created by cutting down a credit
![]() card sized sticker that just so happened to have an appropriate sized
window in place.
card sized sticker that just so happened to have an appropriate sized
window in place.
Booster
My booster frame was made from cardboard while my brother's was made from foam. Dale made both and they are covered in a silver mylar sticker for a painted metal effect.
 The booster itself is made from plastic. In my case it was made from the
end of a toy baseball bat purchased at the dollar store.
The booster itself is made from plastic. In my case it was made from the
end of a toy baseball bat purchased at the dollar store.
Gearbox
My gearbox was made from wood. The plans available for this box didn't fit my design so I made some new plans to fit the materials I had (the space available on the main board and the plastic candy tube for the center. My brother's gearbox was made from foam to movie accurate specifications.
 You can also see the motor assembly. This was made from the end of a
Pringles can or plastic cylinder. It was then covered in a silver mylar sticker to hide the
cardboard tube. The real metal bottom of the Pringles can made an ideal
surface to attach the outer bolts/screws. Mine look a bit more unique than
Dale's because I salvaged them from xbox 360 xclamp replacement.
You can also see the motor assembly. This was made from the end of a
Pringles can or plastic cylinder. It was then covered in a silver mylar sticker to hide the
cardboard tube. The real metal bottom of the Pringles can made an ideal
surface to attach the outer bolts/screws. Mine look a bit more unique than
Dale's because I salvaged them from xbox 360 xclamp replacement.
N Filter
 My N filter was made from a plastic wet napkin tube container. My brother's
was made from a cardboard tube.
My N filter was made from a plastic wet napkin tube container. My brother's
was made from a cardboard tube.
The unique front grill was a part found inside an old VHF radio microphone.
Ion Arm
 My brother's ion arm was made from foam and a light bar keychain. My ion
arm box was made from wood and a sound activated EL light bar (another
component only possible under 12 volts).
My brother's ion arm was made from foam and a light bar keychain. My ion
arm box was made from wood and a sound activated EL light bar (another
component only possible under 12 volts).
The potential of a sound activated light bar is best demonstrated in the video linked that shows the finished light / sound circuits.
Particle Thrower
 The handle was made from a baseball bat that extended through the gun box
for support. The gun box was made from plywood and following a very good
1:1 printout of the individual parts.
The handle was made from a baseball bat that extended through the gun box
for support. The gun box was made from plywood and following a very good
1:1 printout of the individual parts.
The gun box also contains the sound amplifier circuit & speakers plus the main power switch.
 For the particle thrower tip my brother used a clear plastic candy tube
with a glow stick inside. I used a toy light bar and rewired the switch
closer to the handle. The pyramid shape is made of foam.
For the particle thrower tip my brother used a clear plastic candy tube
with a glow stick inside. I used a toy light bar and rewired the switch
closer to the handle. The pyramid shape is made of foam.
Patches
 The no-ghost and name patches were purchased from ebay. The name patch
was custom made with our last name. I thought the patches were very
well done. Right down to the iron-on adhesive on the backs.
The no-ghost and name patches were purchased from ebay. The name patch
was custom made with our last name. I thought the patches were very
well done. Right down to the iron-on adhesive on the backs.
The flight suits came with a velcro patch where the name patch would
normally go. I cut off the threads holding the velcro on. Ironed on my
own name patch. Then used black thread to sew it on for strength.
Red and white thread was used to add strength to the no-ghost patch.
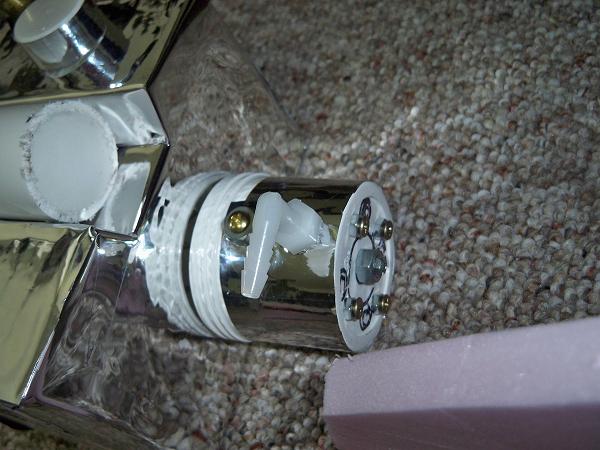
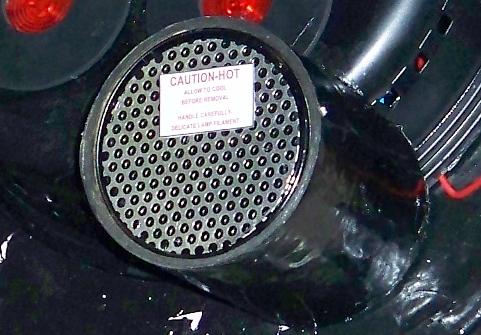
Misc Parts
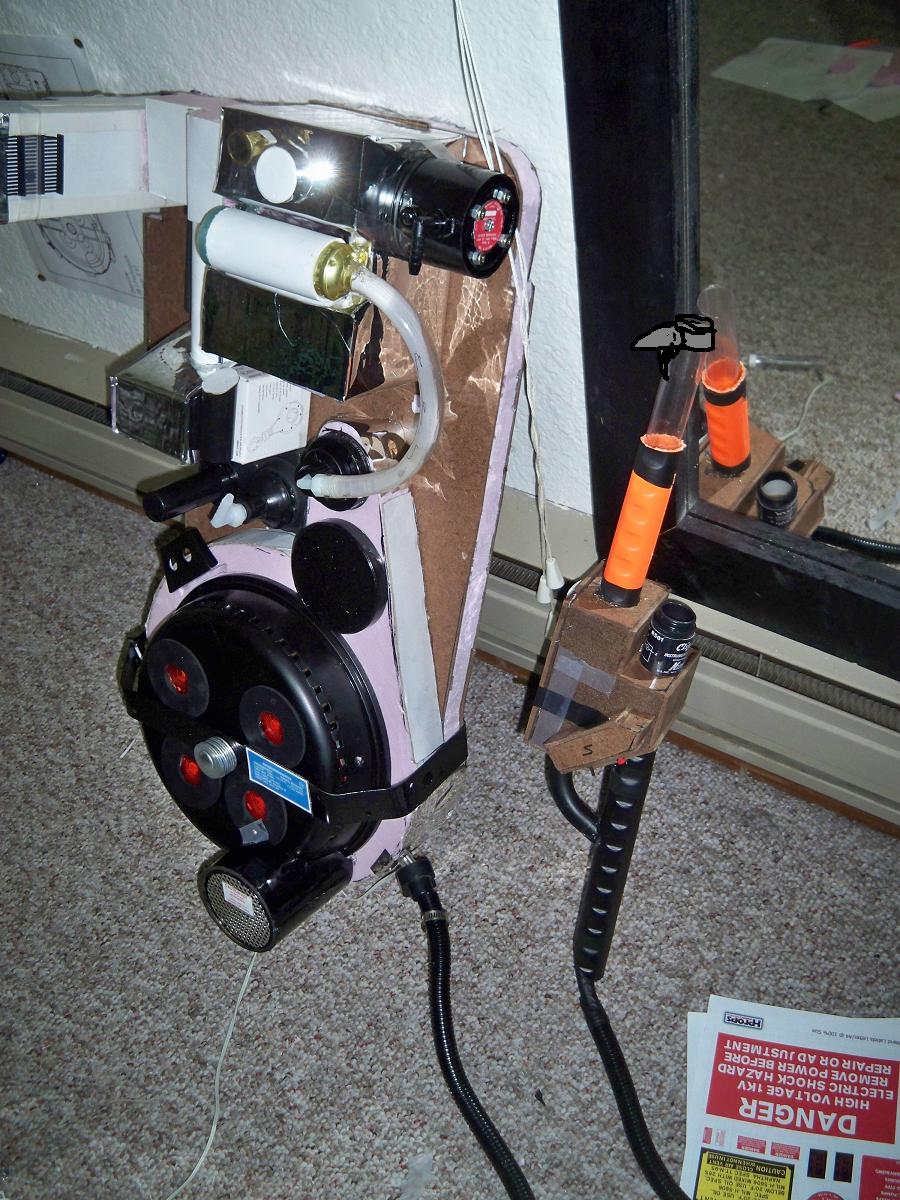
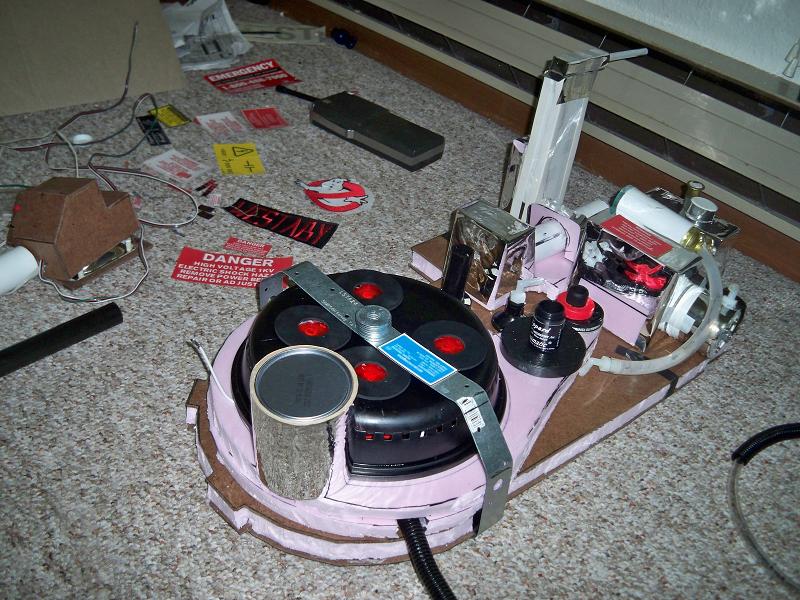 There are several smaller parts you can see. Film canisters for the small
cylinders. Cable management tubing (cheapest ribbed tubing I could find)
with vinyl tubing ran inside for support. Vents & heatsinks made from
real heatsinks or plastic junk.
There are several smaller parts you can see. Film canisters for the small
cylinders. Cable management tubing (cheapest ribbed tubing I could find)
with vinyl tubing ran inside for support. Vents & heatsinks made from
real heatsinks or plastic junk.
Image Gallery
There are many more images available on the forum showing most stages of the project for both proton packs. The images from that Halloween weekend can be found on photobucket.


Video Gallery
Here are some videos I made during construction to show Dale the varied functions.

Conclusion
We achieved our goals. Dale's proton pack and costume were more movie accurate than mine, but I feel I well made up for it in functionality. That aside, we both received equal compliments of awe. Together and separately.
My ion bar broke early on the first the night. I did not know this, but inside of the protective plastic shield for the EL light bar is a glass tube. This makes it fragile to bends. The breakage could have been prevented by using a shorter light bar (4 inches).
As we exposed ourselves to blacklight we noticed that one of our flight suits was much lighter in color and had a spill stain on it. In normal lighting you can't tell anything is there or out of place. Supplier issue?
At the end of the first night, Dale's pack suffered a failure. Because
all of the individual boxes were made of foam and were attached to the
main board with hot glue they were susceptible to tearing at the glue
joints. Unfortunately, this happened as the proton pack was inevitably
knocked around in crowds. Even though half the boxes had torn off, I was
impressed the electronics kept on going. It is my hope that he repairs
his pack so it can be used again at a future date.
I also want to point out my pack does not suffer from the same flaw
(none of my boxes are made of foam).
I went out the night after Halloween and noticed many people still wearing their costumes. I wasn't prepared with my suit, but I grabbed my pack and my friends took turns wearing it. Many more compliments and shouts of "Who ya gonna call?".
I even saw a few other ghostbusters roaming around. One guy with one of those inflatable proton packs they sell on ebay. Then a group of 4 girls, I was impressed with what they achieved only starting the weekend before. Believable proton packs, clear packing tape holding on printed nametags / no-ghost patches, and silly-string equipped particle throwers.
My math must have been close for runtimes, because I left my proton pack on continuously for two evenings (approx. 18 hours) and the lights never dimmed or slowed.