Xbox Controller Port Modification
Adding Xbox controller ports to your computer, so you don’t have to use an adapter to plug them in. Click More Info for the full guide
I take no responsibility for the accuracy of this information, or any damage caused by the instructions of this guide. (I’ve always wanted to say that)
Materials Needed:
- A pc with an internal USB header (or front USB ports)
- A free 5 1/4 inch drive bay
- A blank drive bay face plate
- Spare xbox controller port pair
- 4 or 8 wire cable (shielded recommended)
- Small piece of wood (5″ x 1″ x 1″)
- Wood screws
Tools Needed
- Philips screw driver
- Solder gun (optional)
- Glue gun (optional)
- Heating knife* or Dremel tool
- Sand Paper
- Wire cutter
- Wire stripper
- Drill
- Drill bit of proper size to use with wood screws chosen
*A heating knife is just a normal knife that is ruined from being heated up. Has heat and warp marks. Take this knife and hold it over a strong flame until it becomes hot. It may now be used to cut plastic. Don’t inhale the fumes because the black smoke produced is poisonous.
Construction
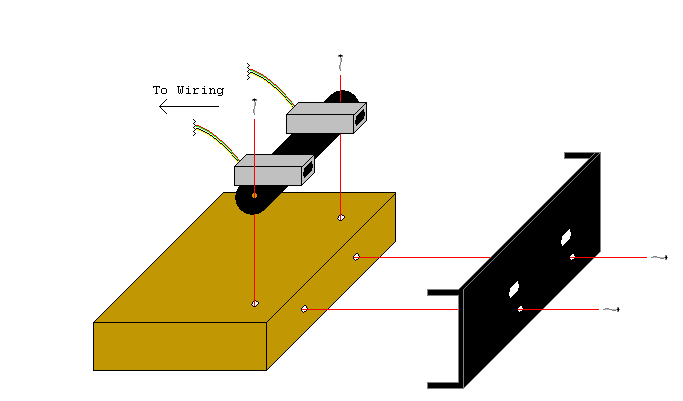
Measure and trace around the controller ports onto the face plate. A heating knife is used to cut away at the face plate following inside the tracing marks. You may use a dremel tool to cut these holes instead. Make the holes just large enough that we may place the controller ports snuggly in them. If using the heating knife you may also want to use the sand paper to sand down the bubbled edges caused from the melting. Hold the wooden block up to the back of the face plate and place the controller ports on top. arrange them so the controller ports will protrude from the face plate the desired distance. Using the controller port’s built in screw holes as a guide make a mark. These marks are where we must make screw holes using the drill and bits. The holes must be approximately the same depth as the screws. This process prevents the wood from cracking when we screw into it. You may screw the controller ports to the wood block at this time. Next very carefully drill a hole just under each of the controller ports. Drilling through the face plate first then the wood block. You want to drill low enough not to drill into the controller ports but high enough that you are not to close to the edge of the block. You may now screw the block to the face plate. For aesthetics you may wish to paint over the screws with the appropriate color for your case. Don’t insert back into the pc yet, we still got to wire this thing up.
Wiring
Solder the controller ports to the 8 wire cable. If you have a 4 wire cable just use two lengths of it. It shouldn’t matter if you use shielded cable or not, but just to be on the safe side I did. You can wire the other end of the cable to either the USB header on the motherboard or splice it in with USB ports on the case.
Option 1 – The USB header
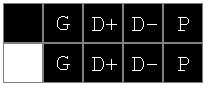
It’s not recommended that you solder directly to the USB header. What you need to find is a USB header connector and solder to that then place it on your USB header. Wire arrangement is as pictured follow the table (below) for proper connections to the xbox controller ports.
Note: A Firewire (IEEE1394) header looks identical to a USB header. Refer to your motherboard manual to differentiate them.
Option 2 – The USB port Splice
This is much simpler. Just cut the insulation of the wire going to the USB port and solder the correct wire to it. Be careful not to mix up controller port 1’s, and controller port 2’s wires. This table will help you properly match each wire.
| Contact Number | Signal Name | PC Color | XBOX Color |
| 1 | USB1 VBUS | Red | Red |
| 2 | USB1 D- | White | White |
| 3 | USB1 D+ | Green | Green |
| 4 | USB1 GND | Black | Black |
| 5 | USB1 Sense | Not Connected | Yellow |
| 6 | USB2 Vbus | Red | Red |
| 7 | USB2 D- | White | White |
| 8 | USB2 D+ | Green | Green |
| 9 | USB2 GND | Black | Black |
| 10 | USB2 Sense | Not Connected | Yellow |
| Shield | Shield | Drain Wire | Drain Wire |
After Thoughts
When inserting this back into my case I noticed that the controller ports were upside down. This was not a problem for my design, but you may want to take it into consideration.
Also you may wish to make the block of wood a bit longer then you see in the picture. Long enough to insert partially into the drive bay. During testing when you insert a controller into the port the force exerted on the modified bay cover is sufficient to push the whole thing off it’s latches and into the pc. I fixed this by attaching the wood block directly to my pc case with a wood screw through the drive bay slots. The down side to doing this is one must remove this screw before I can remove the front of my case housing.