Supernatural Thermal Scanner Prop (Laser EMF Reader)

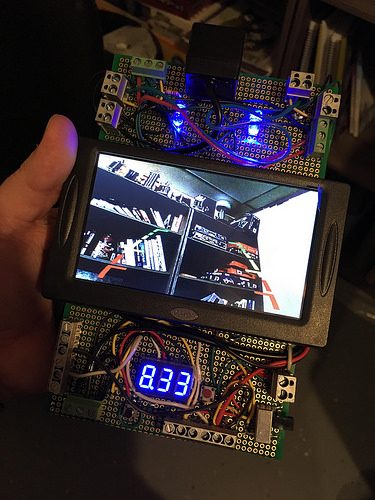
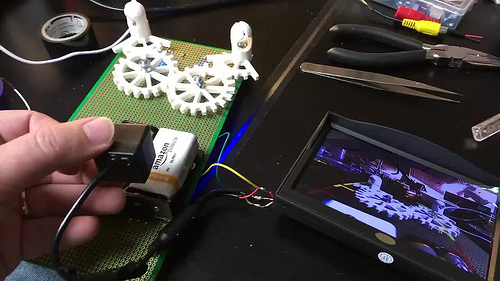
This is my Laser EMF reader, aka Thermal Scanner prop. The Lasers, LCD, and Camera are all functional. In addition, I added gearing to the back so the Lasers could perform a synchronized linear scan.
From the supernatural TV show, there are a variety of EMF Readers used. Especially early on. This paper outlines many of the different variations.
https://drive.google.com/open?id=1NMHmjPoTBNc_L0q0NJRZ6udFnsk44N7sltnDHd17K4Q
The handheld device seen in episode S01E14 is not an EMF Reader, it is a Thermal Scanner. I have made a few of these now and have enough pictures to make this write up.
Part List:
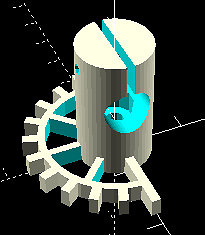
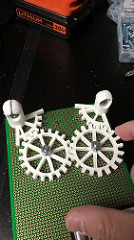
- Optional: 1x 3D Printed Left Laser Holder
- Optional: 1x 3D Printed Right Laser Holder
- Optional: 2x 3D Printed Gears
- 1x EG4367-ND – Slide Switch DPDT
- 1x BC2AAPC-ND – AA Battery Holder PC PIN
- 2x BH9V-PC-ND – 9V Battery Holder PC PIN
- 1x SBBTH4080-1-ND – 8.10″ x 4.20″ Breadboard
- 2x ED2613-ND – 6 Position Terminal Block
- 4x ED2903-ND – 3 Position Terminal Block
- 10x ED2580-ND – 2 Position Terminal Block
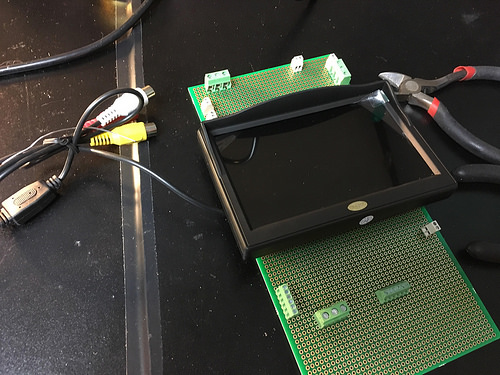
- 1x 5″ LCD + Camera Combo
- 2x Blue LEDs + Resistors
- 2x Green 10mW Laser Diodes
- 1x Momentary Tact Button
- Tool: Screw and Nut combos (find at local hardware store)
- Tool: Rainbow Wire Spool
- Tool: Electrical Tape
- Tool: Matte Nickle Spray Paint
- Tool: Metallic Silver Marker
- Optional: Battery Meter
3D Printing:
The 3D printed parts are optional. I designed them to both hold the lasers and allow them to move in sync. If you opt not to use the 3D printed parts, you can substitute christmas light holders instead.
Painting:
Some of the terminal blocks are blue and need to be painted silver. Poke the terminals into some cardboard to hold upright. Spray paint before soldering into the circuit board.
Trimming:
With the Screw Terminals installed, you have a sense of how the board is laid out. You can see that the breadboard is too long. Use a saw or dremel to trim the board shorter. If the edge is jagged, cover with electrical tape.
Wiring:
This is mostly a wiring project. Most of the wires you see running around the prop are real. There are two voltages on the board, 9V and 3V. Both run to the Slide Switch, which is DPDT with two isolated switching paths.
Wiring 9V Path: The 9V comes from a pair of 9V batteries wired in parallel to increase run time of the LCD. After the Slide Switch, the 9V is wired to power the LCD, Camera, and LEDs.
Wiring 3V Path: The 3V comes from the 2xAA and powers the lasers. After the Slide Switch, the 3V is wired to a momentary button, and finally the lasers. Polarity is not marked on the lasers, so be careful when soldering on some power wires. After powering on for the first time, the lasers need to be tuned. Take a screwdriver and spin the potentiometer on the lasers. 5 turns counter-clockwise to reset, then slowly bring the laser back on. The green lasers I linked are only 10mW, but they sell more powerful laser diodes that can be dangerous. Be careful when working with the lasers. You want them set to the lowest brightness that they can be seen across a room.

Camera Wiring: Before doing anything, test the LCD and Camera by using the cables supplied in the combo kit. Power up with a 9V battery. After confirming you did not receive a DOA device, you can proceed with cutting the cables.
The cables that come with the LCD and Camera are meant for automotive installs. I cut these wires much shorter and splice back together. Do note that the camera likely has a black lump on the cable. This blob likely contains a 12V -> 5V converter. When splicing the cables shorter, keep this block intact and splice around, do not remove.
Issues:
– Backup car lines on LCD are caused by the camera drawing them. Using a non-backup camera should fix.
– Lasers are difficult to tune so they are the same brightness.