Boba Fett Chest Display Circuit: An In-Depth Analysis
A breakdown of the glowly lights on the front of boba fett’s suit.
Boba Fett’s chest display has been a topic of interest among Star Wars fans for many years. I will be diving into the 7 segment animations and uncovering additional hidden frames not seen in the movies. I will also be sharing my latest interpretation of the chest display’s sequence, which I believe is a fresh and innovative take on this beloved character’s iconic suit.
I have previously shared my own version of the chest display circuit on github and have been selling updated versions as a fan interpretation of the animation sequences seen in ESB, ROTJ, and Mando films/tv. With the help of Coffee Bean Dean (fettfromhell) and Holden Baker, I have developed a new method of figuring out the sequence that feels more accurate.
Stay tuned for a future project, where I will guide you through the process of building the circuit without the use of microcontrollers. Instead, I will be using period-accurate chips, as the original prop makers likely did, to create a more authentic and true-to-life representation of the chest display. Including the asynchronous bargraph!
First some terminology:
- Segments: Each individual LED on the display.
- Character: Each grouping of 7 segments, makes a character. Commonly called a 7 segment display.
- Bars: Rectangular segments making up the bar graph.
- Frame: A still image comprised of a specific arrangement of lit segments on the display.
- Timing: The interval of time between frame changes in an animation sequence.
- Sequence: The order of frames in an animation.
- Animation Sequence: The combination of frames, sequence, and timing to create a moving display on the chest circuit.
Background Research
From watching the movie and taking screencaps, eagle-eyed fans have agreed on several frames and a few of the timings for the chest display characters. However, we do not have a complete understanding of the animation sequence for the chest display due to several issues with these screencaps:
- The display is partially obscured by the way it is mounted in the chest armor.
- Poor angles and glare make it difficult to see the entire display.
- The film is edited, so any display sequences observed in different shots cannot be trusted.
- No film shot is long enough to see more than a few frames of the sequence at a time.
A collage of screencaps from fans can be seen below:
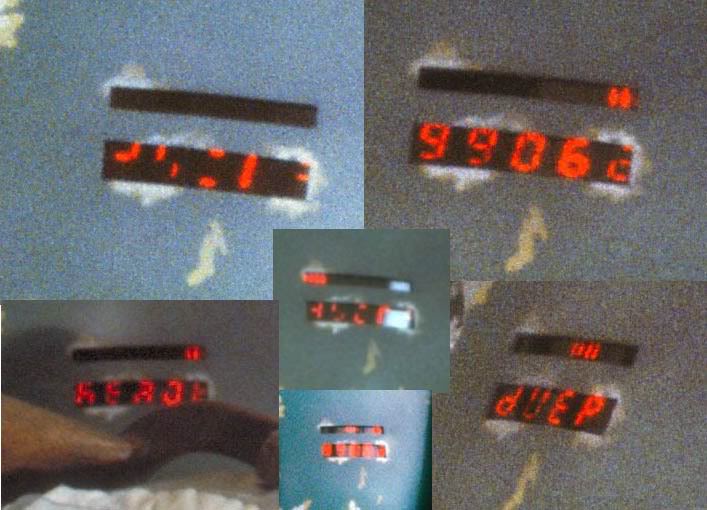
Existing fan-made chest displays have used these and other interpretations to build fan animation sequences. Building what we see in the movie and using microcontrollers to recreate the sequence has had good results, but no fan knows the true sequence. Even the sequence I am about to describe is just an interpretation.
With that disclaimer, let’s dive in!
Understanding 7 segment displays
7-segment displays have 7 segments. Labeled a, b, c, d, e, f, g.
Arranged as shown in the diagram below:

Each LED segment has a pin at the back of the display that powers the LED when it is lit. Each digit also has a common pin that powers the entire display.
Typically, to drive a 5-digit 7-segment display, one wire is needed for each LED. That would be 5 x 7= 45 wires connected to the microcontroller. However, we can reduce the number of wires needed by multiplexing the LEDs, using the display’s common pin. By blinking the displays on and off one at a time, very fast, we only need 5 + 7 = 12 wires.
Pretty good. This is how I have done it for years.
However, the original chest display circuit likely wasn’t wired this way. My hypothesis is that the prop maker used only 7 wires to achieve the variety of frames seen in the movies.
How??
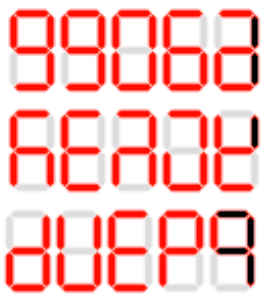
To understand how this was possible, we need to take a closer look at some of our known frames from the screencaps. If we count the number of segments lit on each digit, we will notice that each digit has the SAME NUMBER of segments lit.
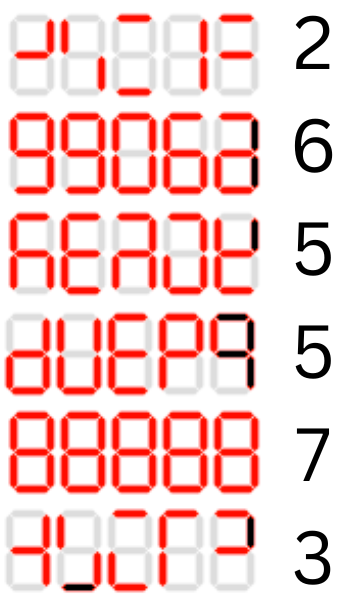
If we wire up our 5-segment displays in parallel to a single counter chip, so each display receives the same number, we can increment from 0 to 9 and repeat. Again, count the number of segments lit on each digit.
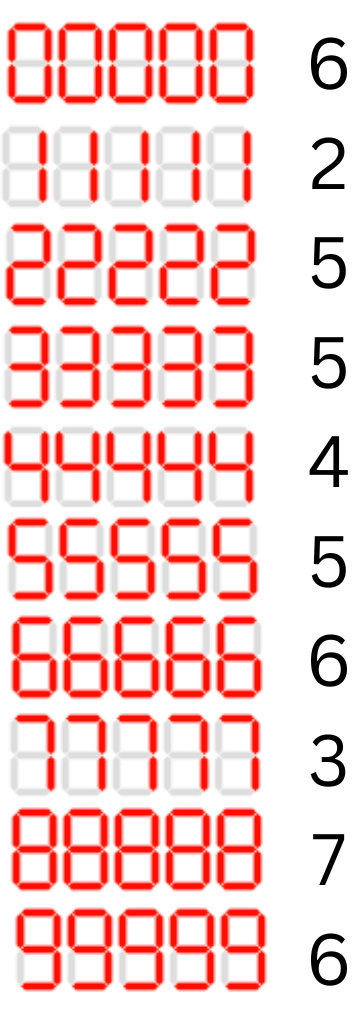
Comparing the results to the known frames from the screencaps, we can see similarities in the counts of lit segments.
If we imagine that we have a single digit counter chip driving all 5 displays in parallel again, but the wiring is jumbled between each digit, each digit will receive a unique wiring encoding of the number to be displayed.
Said a different way, instead of each digit receiving it’s normal abcdefg -> abcdefg wiring. We find the following:
abcdefg abcdefg abcdefg abcdefg abcdefg
||||||| ||||||| ||||||| ||||||| |||||||
cbgefad dcfeagb edagbcf afebcdg bagfedc
With this new wiring, the number sequence will look similar to the known frames from the screencaps, minus the unknowns, and we can extrapolate additional frames that do not appear in the movies.
Here is the abcdefg encoding for each number (left), and it’s jumbled version per our encoding (right).
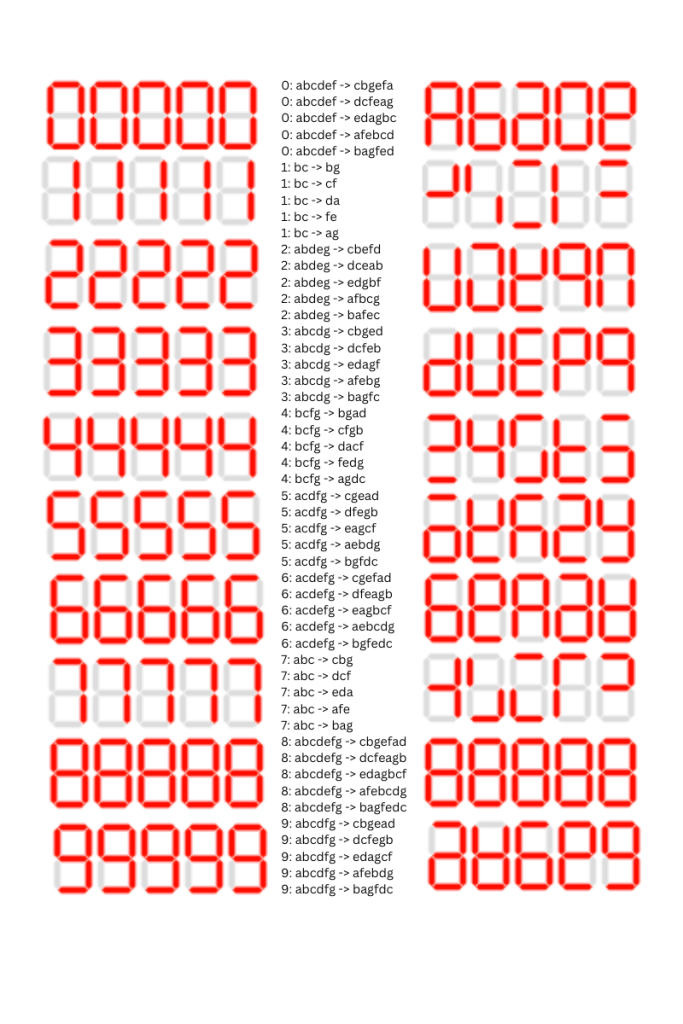
WTF? How did you come up with that cbgefad, whatever, encoding?
The encoding was developed by Holden Baker through extensive work on paper, puzzling out the segment combinations. It was similar to solving non-base 10 sudoku puzzles, as each segment could only be used once in each number encoding and its wiring was then locked in for the other solutions.
Conclusion
The Boba Fett’s chest display circuit is fascinating and fans have been trying to figure out the exact animation sequence for years. Through our research and analysis, we have come up with a new interpretation of the sequence, using a unique wire-based encoding to drive the displays.
While our interpretation is just one of many, it offers a new and exciting way of looking at the chest display circuit and provides additional frames not seen in the movies.
Overall, the original prop makers demonstrated their technical skills and creativity in the creation of this circuit and I am honored to stumble onto their legacy.
Next Steps
My next phase will delve deeper into the implementation of this circuit. I will take you through the process of building it using period-accurate chips, including a clock, counter, and 7 segment driver. Additionally, we will discuss the sequence of the bargraph display.
Sources:
- My store: https://www.etsy.com/shop/WestabyElectronics
- Images were generated using https://www.dcode.fr/7-segment-display
- Screengrab collage: https://www.thedentedhelmet.com/forums/threads/chest-display-project.19951/post-334931
- RafalFett’s most excellent sequences
- Mando Chest Display App (android) http://www.angel-lm.com/MCD/
- My sequence builder: http://www.westaby.net/7seg/
